As a Systems Security Engineer, I spend most of my work hours diving into architecture diagrams, analyzing data flows, and conducting risk and adversarial assessments to protect systems against cyber threats (gotta 💜 being a purple teamer!). One way to protect our systems and ensure data integrity is through the implementation of Hash-based Message Authentication Code, or HMAC.
In this blog, I will discuss what HMAC is, explore its benefits and downsides, and cover best practices, and include some hands-on activities in our own server/client environment! Woo Hoo!!
What is HMAC?
Hash-Based Message Authentication Code (HMAC) is a cryptographic function used to verify the authenticity and integrity of data. It combines a cryptographic hash function and a secret key to generate a unique code associated with the data or message sent. Its purpose is for recipients to verify that the received message or data has not been altered during transmission and that it originated from a legitimate source. HMAC is used by some network protocols like TLS, SSL and SSH, applications, API’s and VPNs to mention a few.
How does HMAC work?
The HMAC key players are the message, the hash, and the secret key. As shown in the diagram below, the client and the server share a secret key. HMAC is the result of applying the hash function to the combination of the secret key and the message. Once the computation is completed, the HMAC, along with the message, is sent to the server, which then verifies that the calculated HMAC matches the one received by performing the same calculations. If there are any discrepancies with the calculations (mismatch of hash, key, or message), the integrity check will fail. this could indicate the possibility of tampering during transmission. If the calculated HMAC matches the received one, the server accepts the message; otherwise, integrity verification will fail.
Importance of HMAC in Secure Communications
HMAC ensures that the integrity of a message remains unchanged during transit. Any tampering with the message would result in a different HMAC, allowing easy detection of unauthorized modifications. The use of a secret key adds an authentication layer to the message. Only receivers possessing the correct key can generate a valid HMAC, verifying the authenticity of the sender. HMAC also includes a timestamp in the message, preventing replay attacks where an adversary resends intercepted messages.
Without HMAC protection, malicious actors can forge messages, impersonate senders, and introduce unauthorized content into the data transmissions. Messages transmitted without HMAC are vulnerable to tampering, leading to potential exploitation.
How secure is it?
Well, HMAC is going to be as secure as you implement it. Its security relies on some of the following:
• Strength of the hash – use functions such as SHA-256, SHA-3, RSA, etc.
• Quality of your secret key – use a strong, randomly generated key.
• Key Management – Remember to regularly update the secret key and keep it safe.
Let’s Roll Up Our Sleeves and Dive In!
I needed to figure out how this all worked, what started as research, became a project. I needed to understand how it can be manipulated, what happens when messages get intercepted in transit and how much we can do.
Note: This demo is to illustrate the Proof of Concept, all messages will be kept in clear text and without encryption for easier demonstration.
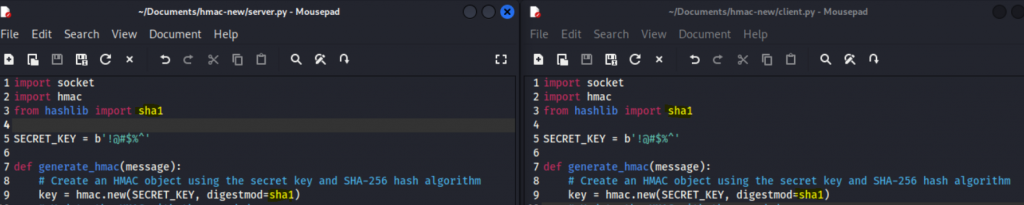
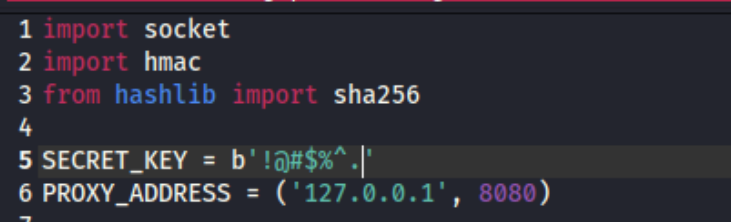
First, I’ll start with a very simple server and client environment written in python. I have included the entire project source code on our GitHub. At the beginning of each code, you will see the following:
import socket
import hmac
from hashlib import sha256

SECRET_KEY = b'!@#$%^'

def generate_hmac(message):
    # Create an HMAC object using the secret key and SHA-256 hash algorithm
    key = hmac.new(SECRET_KEY, digestmod=sha256)
    # Update the HMAC with the encoded message
    key.update(message.encode('utf-8'))
    # Return the digest (hash) of the HMAC
    return key.digest()

# Rest of code
Now, here we have the import of the hmac and hashlib libraries, the secret key and the HMAC computation being performed. You will find this piece of code on the client and the server since both must run their own calculations to validate the integrity of the HMAC.
Once you have both python files, you need to set up the HMAC server and client, we will use the following command to set up a virtual environment:
python3 -m venv venvNext, we activate the virtual environment with the source command.
source venv/bin/activateThere are some requirements that we need for this demo to work, I have included a document on our repo called requirements.txt this have the following libraries needed:
- cffi==1.16.0
- cryptography==42.0.2
- pycparser==2.21
Now we can install these libraries by executing:
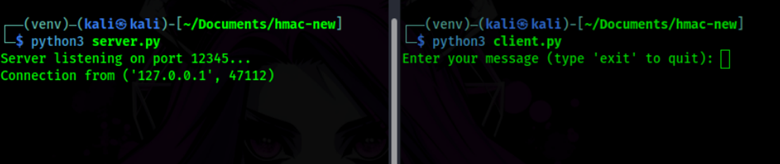
pip3 install -r requirements.txtPerfect! Now we just get to work. Let’s get our server and client running the following commands:
python3 server.py

python3 client.py
Once the environment is set, you should have something like this!
Md5:
We want to test the less secure hash, MD5. I wanted to see how the client and server would interact with each other and if I could run hashcat against it, would I get the result I need. So, I sent “Test1” as a message to the server and we get the following message

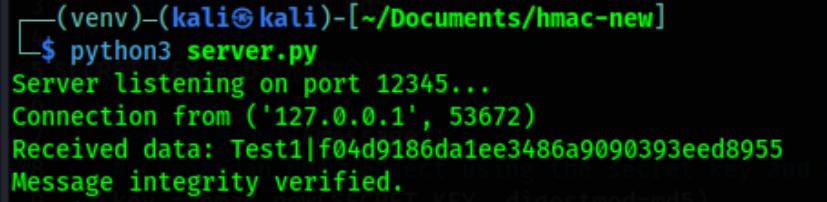
Great! The server shows us the message sent from the client, our MD5 hash and a message stating that the integrity of the message has been verified. In other words, the calculations made by the client and the server match.
Now, we know 2 pieces of the HMAC calculation puzzle. We have the message and the hash, but what is the secret key? Well, to solve that mystery, we will use our greatest friend and ally, hashcat!
Now, after some research, I found out that hashcat needs the message sent alongside the hash to crack the secret key. Here is the correct format to put in our hash.txt file.
hash:message
f04d9186da1ee3486a9090393eed8955:Test1
Here is the command with the mode assigned to 50, this is the HMAC-MD5 mode value, now let’s get cracking!
hashcat -m 50 -a 0 hash.txt rockyou.txt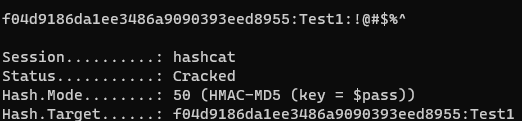

Great! The retrieval of the secret key was successful! It didn’t take long; I mean it is not the best hash or secret key out there, so I had to try SHA1 and SHA256. Remember to change the code on the server and client python script to the hash you want to use (see highlights below).
Also, make sure to change the mode for the hashcat command for the hash you will be using. Remember to check hashcat.net for modes and other HMAC hash examples.
Below are some examples of the results yielded from my testing with SHA1 and SHA256.
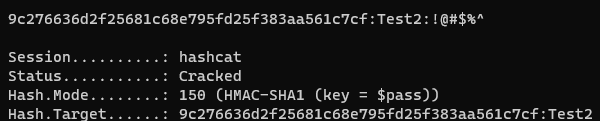
SHA1

9c276636d2f25681c68e795fd25f383aa561c7cf:Test2
hashcat -m 150 -a 0 hash.txt rockyou.txt
SHA256

9c2f455d145ee15d315ff254f3e18b057ae246d17e3f88e44e0c585ddd7f9fc7:Test3
hashcat -m 1450 -a 0 hash.txt rockyou.txt
The BURP Journey
Soo! We have covered so far how HMAC works, how we can get the key with hashcat, but I needed to see how the server will react if I manipulate the message in transit. If you got a copy of the repo for this blog, you would notice that there are two client script files named, client-BURP-HTTP.py and client-BURP-RAW. Don’t you worry there is a reason for the madness, see, the idea initially was to create https client and server interaction for this blog, but I keep having an integrity check fail.
If you take a closer look at the code of RAW and HTTP, they are similar. However, the HTTP client script is meant to provide us with all the information from the http request.


When I run the http client, I get the following result.
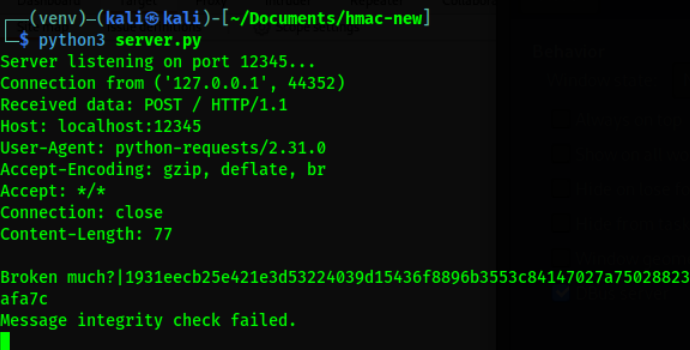
I checked that the computation on the code was correct, that the hash and the key were same between both client and the server, but I kept getting that Integrity check failed. So, I decided to crack the key with hashcat using the hash that the server provided.
And I then get this!

We are having a bit of an issue with the computation! You see, the client is only sending the message but when server receives all the data received from the http request and it puts them in the calculation, therefore, the integrity fails, for the purpose of this blog I need something that would provide me with a more accurate integrity check, hence the second client script.
Let’s intercept!
Now, we can use BurpSuite to manipulate and intercept the information sent from the client side, however, I decided to use the raw data instead of the http. Now, we use the BURP-RAW script for this part of the hands on. I wanted to keep using Burp for my intercept but who do I manipulate non-HTTP traffic and that’s where NoPE comes in play. Non HTTP Proxy (NoPE) is an extension for Burp Suite that intercepts non http protocol, and so much more. Check this GitHub page for more information.
To add the extension on Burp Suite just look for the Extensions tab, then the BApp Store and then use the search bar to look for NoPE and install.

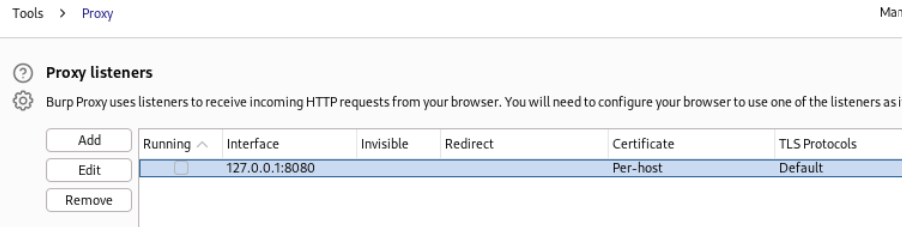
Great now that with the tool downloaded, we can get to work. First, we need to go to the regular Burp Suite Proxy tab, here we need to make sure that the proxy on Burp is unchecked.
Next, head to the NoPE Proxy tab and click on the “Server Config” and head to the Non HTTP Proxy Settings
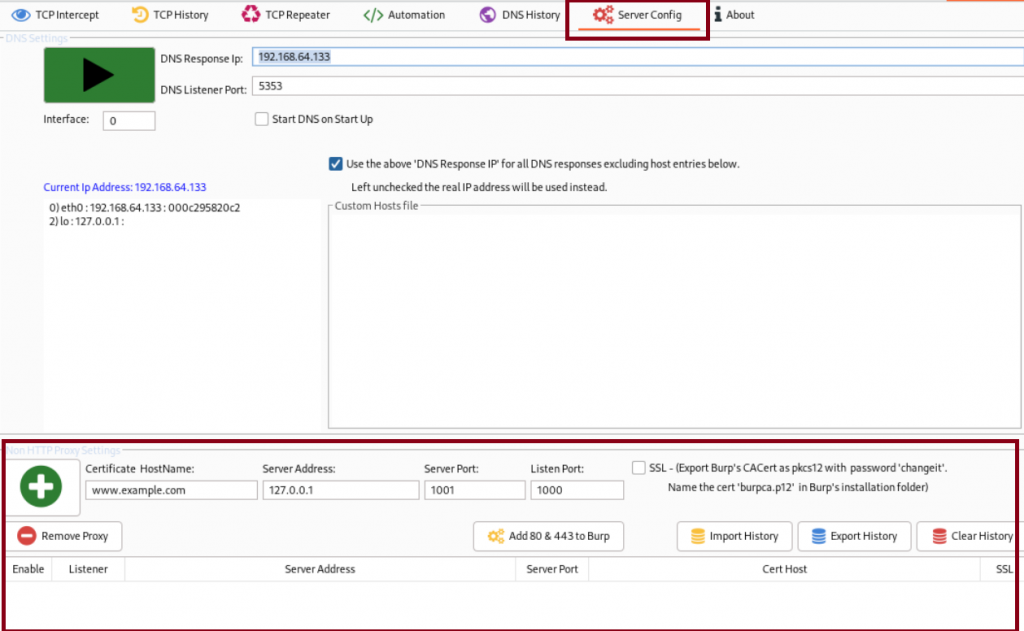
Now we proceed to fill the information as follows:
– Certificate HostName: test.host
– Server Address: 127.0.0.1
– Server Port: 12345
– Listen Port: 8080
Once you have completed all the information, click the plus sign and check the enable box.
Now that we have all we need, we move to intercept and modify, shall we?!
On our terminal we run:
python3 client-BURP-RAW.pyOnce the client is up let’s type and send a message, the terminal should look like this:

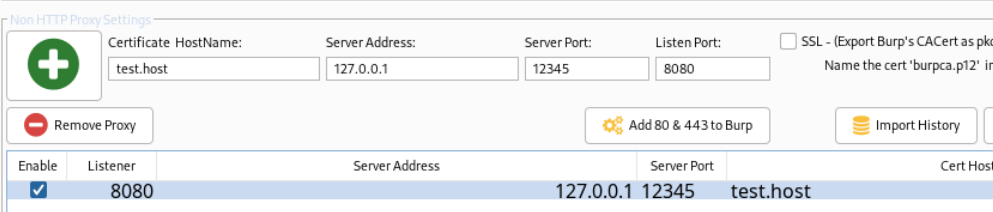
Our server has not yet received the message yet. Let’s check the NoPE Proxy TCP History and notice that our message is showing on the history alongside with hash!

Great! Now, let’s modify our message! Let’s go to the TCP Intercept tab and modify the message before forwarding it to the server.

Once we forward the message to the server the intercept screen will go blank, and we will receive the following message on the server.
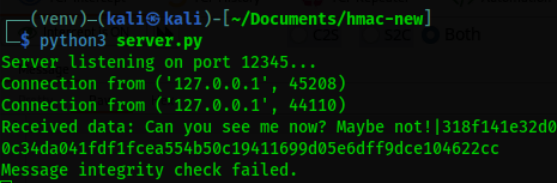
It worked! Our integrity check has failed, let’s confirm with hashcat that our secret key is not exposed as well.

We do not get the key, even if we have the right hash, HMAC did its work.
We now slightly change our secret key on our client.
We sent our message from our client to the server without modifying the message

We get an integrity failed message

Do we get anything on hashcat? No results!

We have tried different secret keys & modified messages in transit, and we have not been able to successfully have an integrity check valid, nor successfully expose the secret key when the message is manipulated or when a secret key has been changed.
Conclusion
As cyber threats continue to evolve, it’s crucial to adopt robust measures to safeguard communications. HMAC stands as a strong defender against unauthorized access, message tampering, and forgery. Implementing HMAC ensures that your communication channels remain resilient to a variety of attacks, providing a foundation for secure and trustworthy interactions.
I hope you enjoy this blog. Feel free to explore and dive more into HMAC as I will. Stay tuned for more info in the upcoming months.
It’s time to get back to OSCP prep! 📚👩🏻💻 Until next time!