
Late September… We bought 4 Raspberry Pi 4’s, and then 3 days later, the Raspberry Pi 5 were announced….

After getting over my “UGGGHHHH” emotions, I realized that I was extremely lucky that I could easily return the 4’s, preorder the 5’s, and simply wait a bit longer for the new models. It seems to have been about 5 years between the 4 model B and 5 release, so the timing worked out pretty well. This is our first time playing with any Raspberry Pi devices, and while we have seen some of the cool hardware things that can be done, we will be sticking to software / penetration testing tinkering for now.
So, with 4 separate Pi devices, how did we start setting things up? What do we name these devices? What kick-ass things come in 4’s?! Ninja Turtles? Fantastic 4? The A Team? Ghostbusters??! The list goes on. So, what did we end up going with? Those damn kids from South Park. You know the ones. Our raspberry Pi devices have been blessed with the following host names:
- Cartman
- Kenny
- Kyle
- Stan

Now that we’ve had a couple months to play around with these little bastards, I’ll utilize this blog space to reflect on what’s been done. I have been wanting to poke around at Android APK security testing and figured this was the perfect time to really dig in on setting up an environment and a test case. There are great platforms for this kind of thing, such as mobexler, which we will be pretty much mimicking most of the tools on our Raspberry pi 5. As a bonus, I wanted to learn more about docker-y stuff. What I discovered is that these topics so far have blended very well together. This is our first blog with our new layout, that now includes quick copy code blocks for convenience of those following along! {RicFlair-WOOOOO}! Just Be aware that some code blocks may include multiple commands within one. Let’s get started.
CARTMAN1
“No, Kitty, This Is My Pot Pi…”
Starting with my first raspberry pi, Cartman, I installed just the default Raspberry Pi OS (64-BIT) from the Raspberry Pi Imager tool. All the Raspberry Pi devices have a 32 GB SD card, after installing the OS, and installing the SD card to the Cartman Pi, I connected the necessary peripherals, and got to work. First, I’ll talk about how I setup software.
The first pieces of software I installed are the following:
sudo apt install adb apktool default-jdk pidcat sqlitebrowser npm pipx -yMore Info for these tools:
| TOOL | LINK |
| Android Debug Bridge (ADB) | https://developer.android.com/tools/adb |
| Apktool | https://apktool.org/ |
| default-jdk (required for jadx-gui) | https://github.com/skylot/jadx |
| pidcat | https://github.com/JakeWharton/pidcat |
| sqlitebrowser | https://sqlitebrowser.org/ |
| npm (required for Runtime Mobile Security (rms)) | https://www.w3schools.com/whatis/whatis_npm.asp |
Playing with Jadx-Gui a bit previously, I wanted that in my Cartman Pi environment as well. I Simply visited their GitHub (https://github.com/skylot/jadx/releases) and grabbed the latest .zip file. Unzip, open /jadx/bin/ and execute jadx-gui to open. I will come back and use this tool later.
Here, I am installing Frida and objection tools with python:
pipx install frida-toolspipx install objectionAs I began using these tools, I received an error with the tools not being found. The fix was to add the following path to your PATH variable, replacing the <USER> with your username:
export PATH="/home/<USER>/.local/bin:$PATH"Bam, done. Okay, the next objective is to fire up an Android device. 2 options are provided below.
KENNY1
“Oh My God! They Killed Cartman!”
OPTION 1:
Switching over to the Kenny-pi device, I utilized the Raspberry pi imager tools to flash Android onto a the SD card.
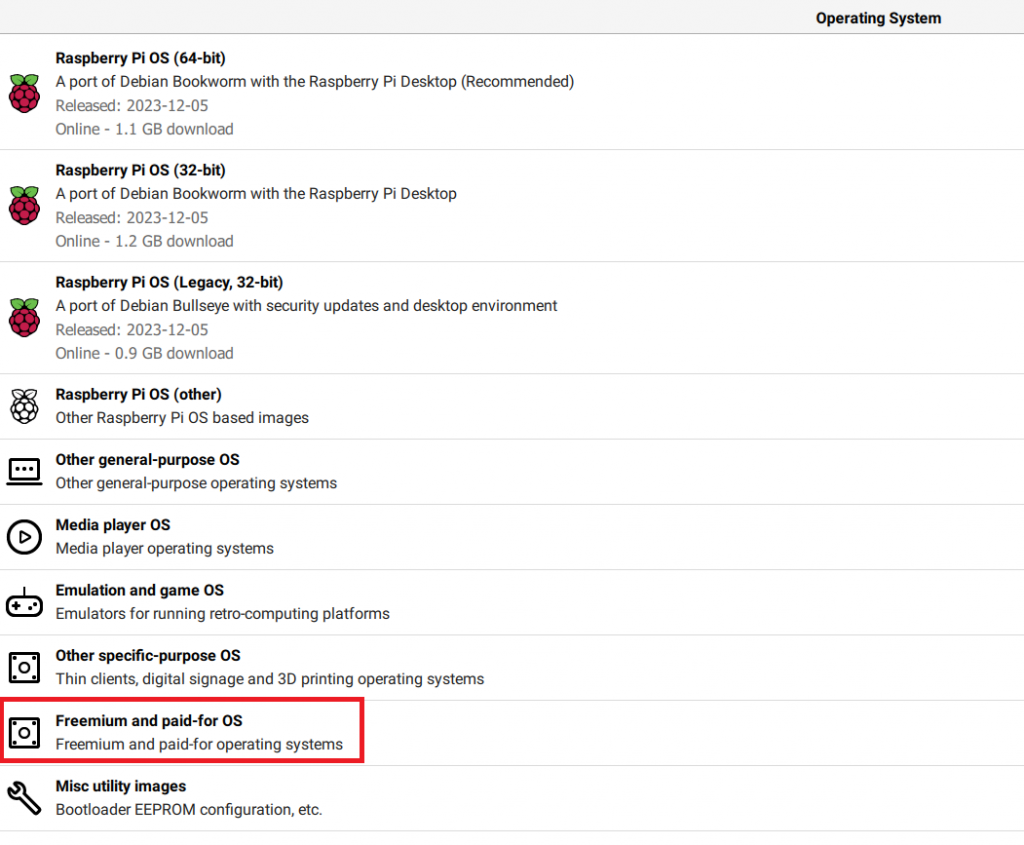
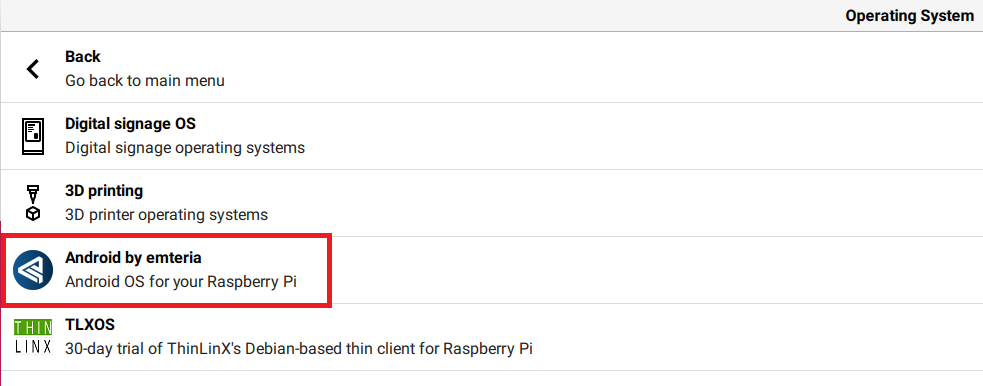
Raspberry Pi Imager > Freemium and paid-for OS > Android by emteria
Pop the SD card into Kenny and I am ready to go! From here on out, Any IP addresses in screenshots are blocked out, and I will be referring to any IP addresses simply as “x.x.x.x” as a reminder for anyone following along to use your own, and not accidentally configure your environment with what is in the screenshots.
OPTION 2:
Not long after playing around, I changed my strategy up a bit regarding the Android environment. While the first option ran really well, I wanted to checkout Linage OS on VMware workstation pro, running on a desktop. I grabbed a copy from here (https://www.osboxes.org/android-x86/). There are images for VirtualBox and VMware. Once I got Linage OS loaded in my virtual environment, I wanted to check for a few things before getting to crazy:
- Root access
- ADB connectivity
Root access will play an important role in completing a lot of security checks. Once Linage OS was loaded, there’s already a terminal app installed. Once loaded, I simply ran the following and became root:
su
Too easy! On to the next task, getting remote ADB connectivity. To do this, I need to first enable developer options within the Android OS. This was completed by going into Settings, look for “Build number”, and tap it several times, a message will show up confirming Developer options is now enabled. Going back to the main Settings page, I now have “Developer options”. Once here, under the “Debugging” section, I had to ensure “Android Debugging” and “ADB over network” are enabled. Once the Android device is shut down or restarted, the “ADB over network” option is disabled by default, meaning I must consistently enable it every time I want to connect to it. Yea, gross, right?? However, I can access a short cut from the quick options in the pull down, like so:
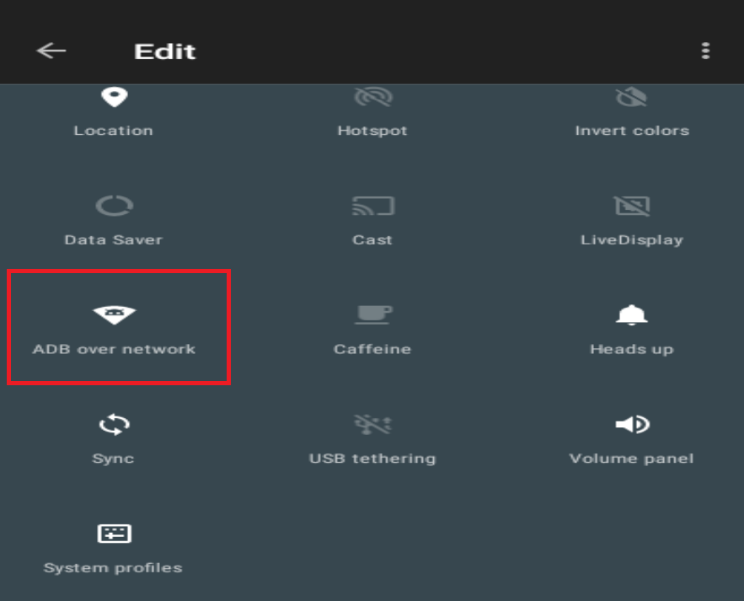
Ok, better, not so bad, just need to enable that button every time the device boots before connecting to it remotely. Moving on now, back to the testing environment.
CARTMAN2
“Screw You Guys, I’m Going ~!”
Next, I started working on getting Docker installed, which was super easy to do:
curl -sSL https://get.docker.com | shAt this point I did a little research regarding docker management, and came across Portainer and Dockge, which are meant to simplify the adaptation of containers. In this exercise, I will move forward using Dockge as container manager. Now I am ready to start getting mobile app analysis tools installed, starting with MobSF. Promising to stick with docker images the best I can, the instructions here inform to use the following command for installation. According to here, arm64 support (raspberry pi) in included in the latest.
With Dockge, I simply paste this command into the Docker Run entry box and hit the Convert to Compose button.
docker run -d -p 8000:8000 --name=mobsf --restart=always -v /var/run/docker.sock:/var/run/docker.sock -v mobsf_data:/data opensecurity/mobile-security-framework-mobsf:latestOnce running, I can simply hit the port number button, and MobSF should load right up:
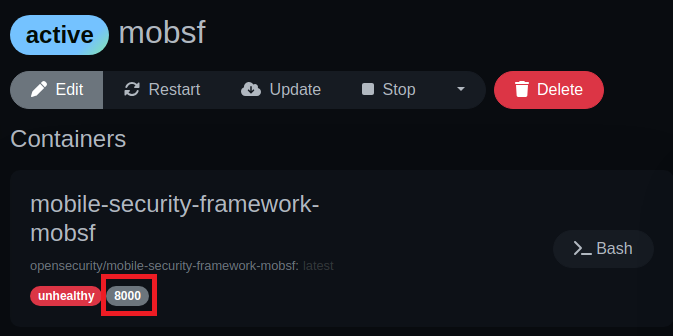
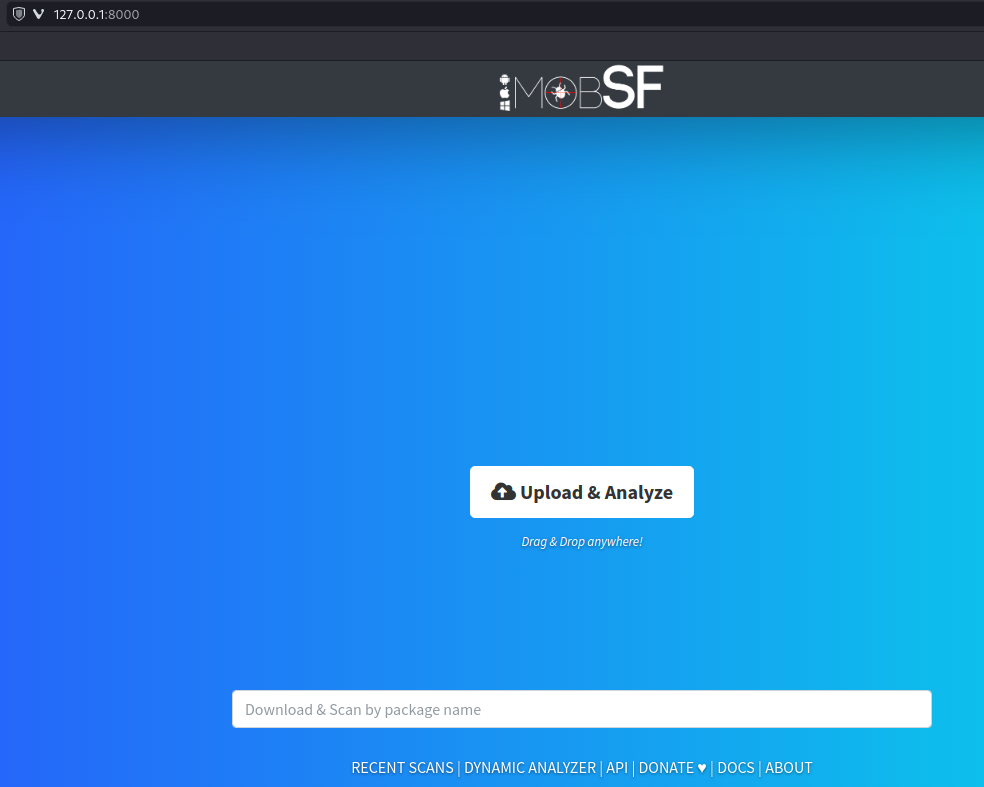
Fantastic, MobSF is up and running! Once I get a test APK file downloaded, I can upload it here and check it out.
As research continued to discover more tools, I came across Drozer in several references. With Drozer requiring python2.7, this could get quite messy trying to install along with its dependencies. However, with the Drozer Docker image, I can set this up in just a few steps. First, I download the required drozer agent-debug.apk file, install it to the android device by running the following command in terminal.
adb connect x.x.x.xWhen I ran with command with Option 1 above, Emteria’s Android image, I had no issues, however, when I started using Linage OS as VM, I received a “failed to authenticate” message. When going with Option 2, a few additional steps may be necessary here:
A new hidden folder has been created in the home directory that includes adbkey files.
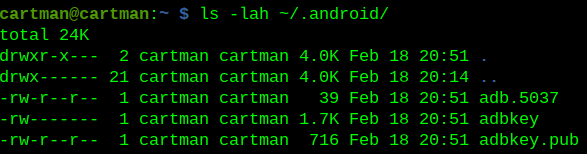
Here I need to find a creative way to transfer adbkey.pub over to the android device as adb_keys. The first command ran on my pi will cd to the correct directory and set up a quick server on port 9000 using python:
cd ~/.android && python3 -m http.server 9000Now over on the Android device, after ensuring I am root, I grab the adbkey.pub file and import it into the /data/adb directory:
wget x.x.x.x:9000/adbkey.pub > /data/misc/adb/adb_keys
Next, I gotta kill the adb server, and reconnect to the Android:
adb kill-serveradb connect x.x.x.x
Success! I can now finally continue on normally, and start getting the Drozer agent-debug.apk file uploaded by running the following command from my pi:
adb install -r agent-debug.apkadb forward tcp:31415 tcp:31415Verify port forward is correct with:
adb forward --list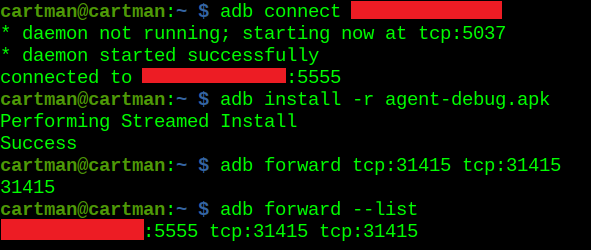
From here, I open the drozer agent application on the Android device and enable the embedded server:

Now I go back to Dockge and run:
docker run --net host -it withsecurelabs/drozer console connect --server x.x.x.xHere I replace x.x.x.x with my Android VM device IP address.
Now I want to check to ensure I can get a terminal with the following command:
sudo docker exec -it $(sudo docker ps | grep drozer | awk '{print $1}') shTesting to see if I can run drozer:
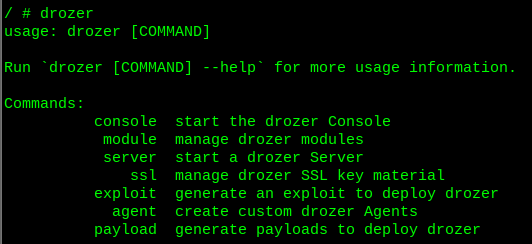
drozerSeeing the help page as shown below confirms success!
The next tool to install is Runtime Mobile Security, and can be installed with:
sudo npm install -g rms-runtime-mobile-securityI’ll try running with:
rms
Beautiful! I am now finished with phase 1, gathering necessary tools to perform APK testing on a raspberry pi!
AndroGOAT
Now that I have some fancy tools, and a dedicated Android device to poke at, I’m grabbing a purposely vulnerable android app to help test drive our environment, AndroGOAT. Read more on AndroGOAT here: https://github.com/satishpatnayak/AndroGoat
Direct download link: https://github.com/satishpatnayak/MyTest/raw/master/AndroGoat.apk
Before jumping right into installing on the Android device, I wanted to crack it open in jadx-gui and take a look. After opening AndroGoat.apk in jadx-gui, I am able to dig through the source code, review the AndroidManifest.xml, and search for keywords. Not too shabby.

Circling back to MobSF tool, it’s finally time to upload the APK:
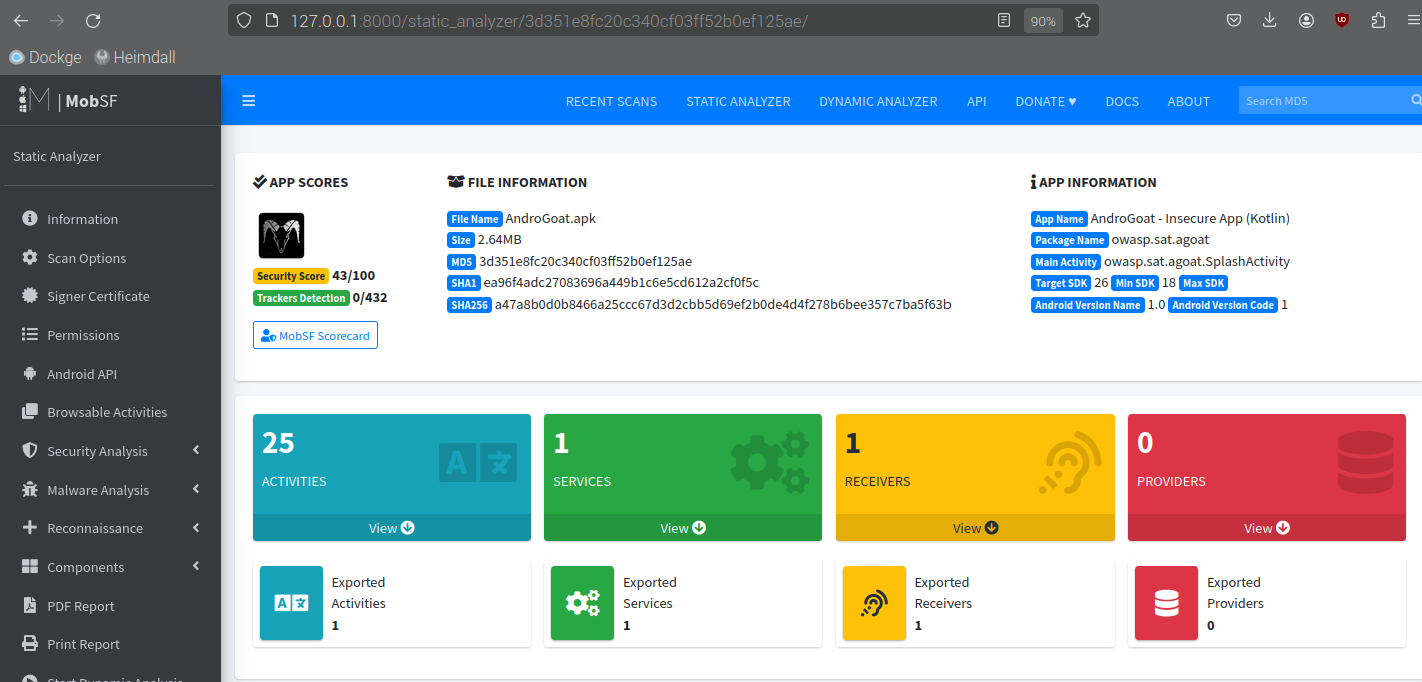
Nice, appears to have worked properly. There are a lot of details in the report, so I wont spoil it for anyone here :D.
WARNING: Dynamic analysis is not able to be completed with MobSF installed either as a docker, or in a VM. If you need MobSF for dynamic analysis, refer to the following comments for further information.
To install the AndroGoat.apk file on the Android device, I used adb to install the application, just as I did with the drozer agent.
adb install -r AndroGoat.apk
AndroGoat – NETWORK INTERCEPTING
HTTP
Finally, the first Android testing scenario! First, I had to grab BurpSuite to set up proxy and intercept capabilities, and since it’s getting installed on a Raspberry Pi, I had to ensure to grab the Linux (ARM) version: https://portswigger.net/burp/releases#community
Download, make it executable, and install.
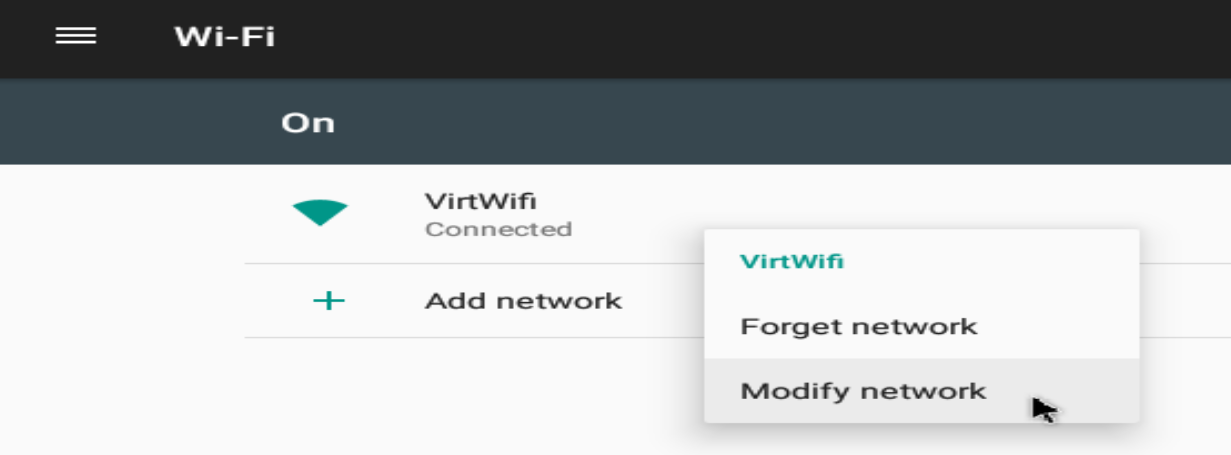
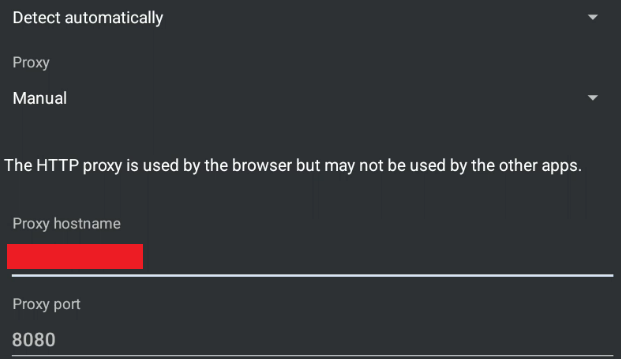
chmod +x burpsuite_community_linux_arm64_xxxx_xx_x_x.sh./burpsuite_community_linux_arm64_xxxx_xx_x_x.shAll I gotta do is proxy the Android to point to the Burp IP address. While using Linage OS, I found proxy settings in Wi-Fi > VirtWifi > right click > Modify network > Advanced options.
Otherwise, these proxy settings can be found in the network & internet section.
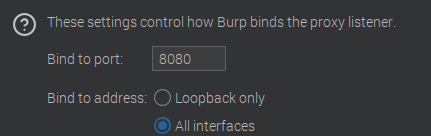
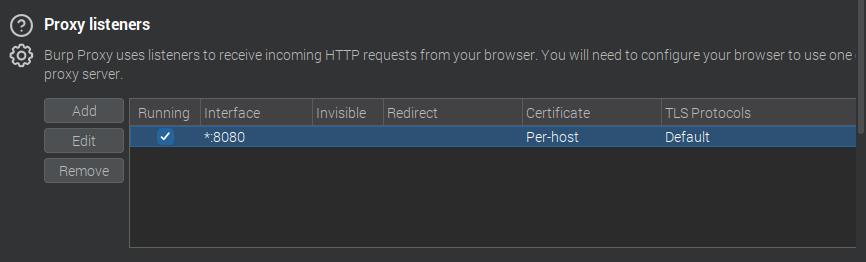
Here I am firing up our trusty BurpSuite application, and ensuring I have proxy settings set up correctly. I had to go in and switch the port 8080 listener from Loopback only to All interfaces.
Opening up the AndroGoat app, I go into network intercepting and click the HTTP button, then go back into BurpSuite to check for success.


Lovely! I am capturing data through BurpSuite, challenge 1 completed.
HTTPS
I start this task by simply pressing the HTTPS button, and seeing nothing happens in Burp. In this case, I just need to export a certificate from Burp, and install it onto the Android device. Back in Burp > Proxy Settings > click the “Import / export CA certificate” button > select “Certificate in DER format” radio button > click Next.


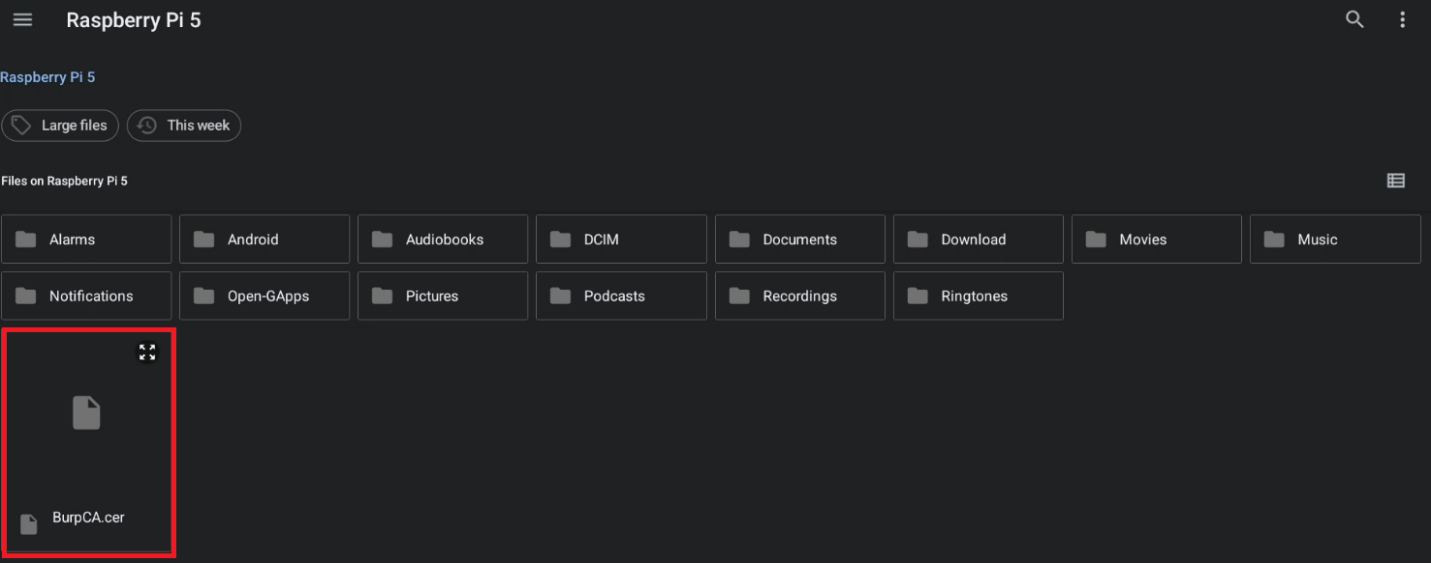
Here, I simply provide a file name, and change its extension to .cer, For example, I will name mine BurpCA.cer

Now I push the file to the Android device using adb:
adb push BurpCA.cer /sdcard

All that’s left to do is install the certificate within the device. This can vary a bit depending on the version of Android, but I just open settings, and search for “certificate”.

After installing the certificate, I go back into AndroGoat, and smash that HTTPS button again, to finally see the traffic captured in Burp.

Bam. Challenge 2 is complete.
Certificate Pinning
Just like last time, I start clicking on that button, and nothing happens. From the research conducted, I’ve seen most demonstrations using Frida and Objection for this task. There are some tools solely dedicated to certificate pinning bypass, I will use Frida as well, since I can use this Frida for other purposes later on.
This part can be a bit tricky; I need to get a Frida server running on the Android device. First, I visit the GitHub repo: https://github.com/frida/frida/releases/
Be sure to click the “Show all assets” button to see all options if following along. There are currently over 250 to choose from. Luckily, I can narrow down by looking at only the Frida-server options. From the approximately two dozen options, I narrow it down to the four frida-server-xx.x.x-android options.
For the Android running on the Raspberry Pi, selecting the arm64 option worked perfectly. For the Linage VM, selecting the x86_64 option worked. Once I had that downloaded into the environment, I extracted it, and then renamed it for the sake of an easier name:
mv frida-server-xx.x.x-xxxxxx-xxxxx frida-server
adb push frida-server /data/local/tmp/Cool, I better check it on the device to ensure it’s there for real real. Using ADB’s shell command, I shell into the Android, cd to the /data/local/tmp directory:
adb shell
cd /data/local/tmp
NARLY. I chmod +x to make it executable, then tried to run it, only to get slapped with the following permission error:

I need to run Frida-server as root. Luckily, Emteria (Option 1) has this capability by running sushell
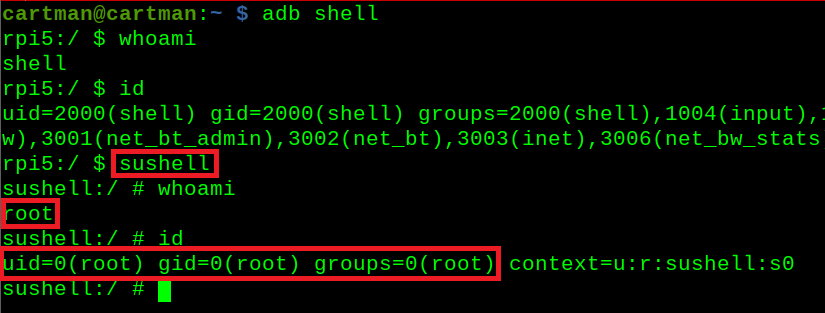
And for Linage OS (Option 2), it’s just su
I need to try that again, as root:
/data/local/tmp/Frida-server &
Let me see if I can interact with it back in my Cartman environment:
Frida-ps -aiU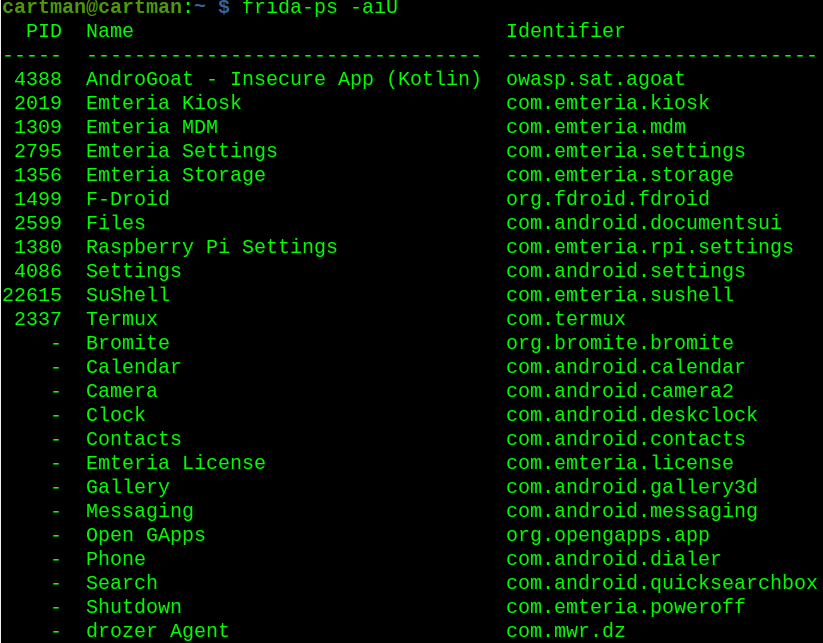
Yeap, look about right, I can see AndroGoat along with the other applications installed on the Android device. I’ll poke it with objection:
objection -g owasp.sat.agoat exploreThere is a built-in command for disabling sslpinning, better give it a shot:
android sslpinning disableDid it work? I gotta crush that button again to find out:

I have capture abilities again, NOICE.

AndroGoat – UNPROTECTED ANDROID COMPONENTS
For this objective, it is hinted that I to investigate the activities within AndroGoat. There seems to be sensitive data locked behind this pin request. From terminal, I can pull the activities list like so:
adb shell dumpsys package | grep -i owasp.sat.agoat | grep Activity
Or, Drozer can be utilized to accomplish this same task, like so:
drozer console connectrun app.activity.info -a owasp.sat.agoat
Nice, only 2 activities. I suspect that the “SplashActivity” may be related to the opening animation of the application, so I’ll focus on the AccessControl1ViewActivity option first.
adb shell am start -n owasp.sat.agoat/.AccessControl1ViewActivity
Success! The pin requirement has been bypassed, and access do the invoice has been granted!
AndroGoat – INSECURE DATA STORAGE
Shared Preferences – Part 1
A user enters their credentials, and those credentials are stored in plaintext file (users.xml) on the device. Root access is required to read the local file on the Android device as shown:
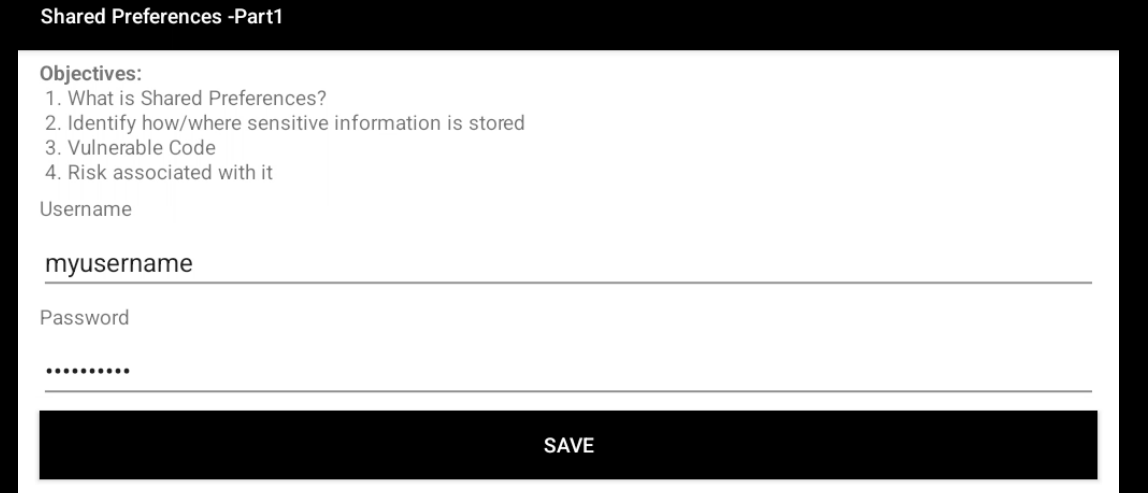
After entering a username and a password, I jump back into the terminal, cd to the following directory, and simply read the users.xml file for plaintext creds.
cd /data/data/owasp.sat.agoatcat users.xml
Shared Preferences – Part 2
The objective here is to get to a score of 10000, but the button only increments by 1 whenever pressed.
vi score.xmlJumping into vi editor, I just need to press ‘i’ for interactive mode, and modify the score for the win:

Once modified, save and exit vi with by hitting: escape, then typing “:wq“
Close and reopen AndroGoat > Insecure Data Storage > Shared Preferences – Part 2 > Click Score button > Profit
SQLite
Like before, user enters credentials, but now are stored into a database. No database browser installed on Android device, no data is visible when catting the file. Instead, I can try to output the original file into a new local file (agoatPull) and open into a DB browser application where contents can be properly read.
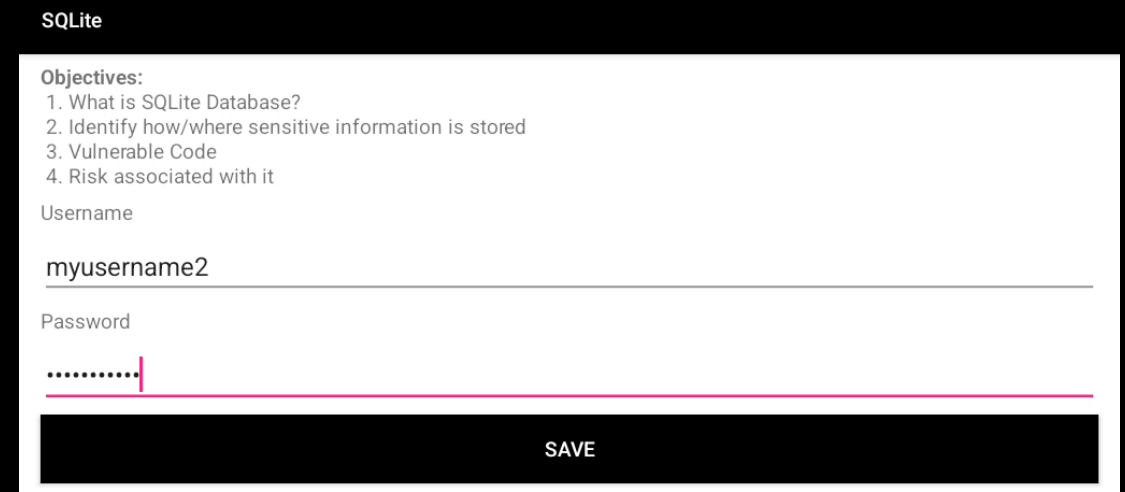
Below, there is no table entry viewable:


Writing content into new local for ownership, then opening in DB Browser:


Temp File
User enters credentials, which then are stored into a temp file. With root access, able to go in and read that file for plaintext credentials.
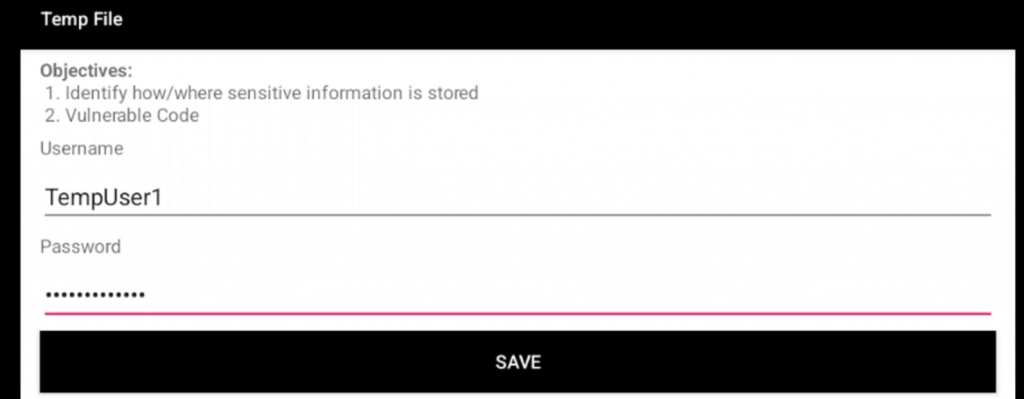
cd /data/data/owasp.sat.agoatHere I find the tmp file, and simply cat it out:

External Storage – SDCard
User enters credentials which are then stored on the SD card (external storage). Navigating to the proper directory, I can read the plaintext credentials.
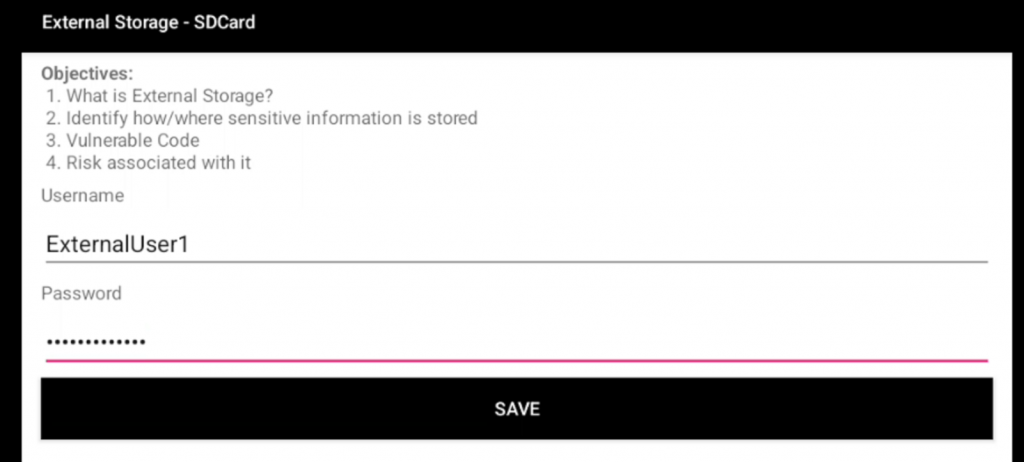
cd /sdcardSame as last time here, I find the tmp file, and simply cat it out:
AndroGoat – INPUT VALIDATION
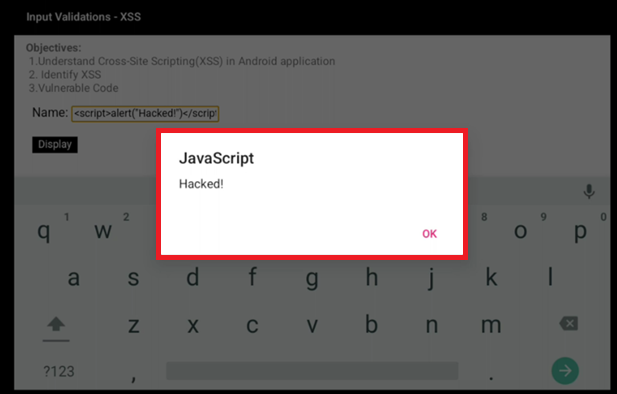
XSS
As seen below, a simple XSS payload has triggered the alert box to appear on screen.
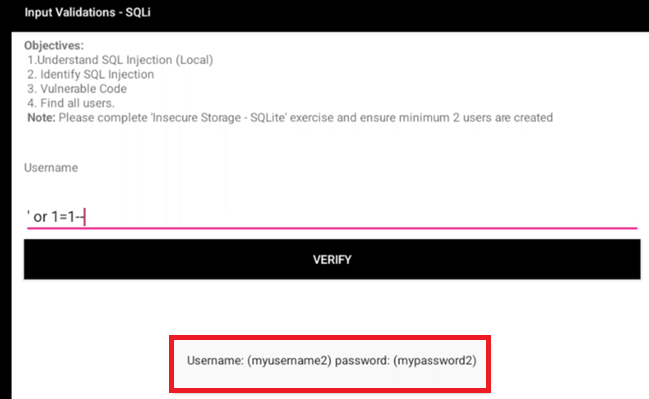
SQLi
Testing for SQL injection on input field.
WebView
Testing input for local file read access. Here I am able to read the users.xml file exposing plaintext credentials.

AndroGoat – SIDE CHANNEL DATA LEAKAGE
Insecure Logging
User enters credentials which are then included in the logs in plaintext.


AndroGoat – HARDCODE ISSUE
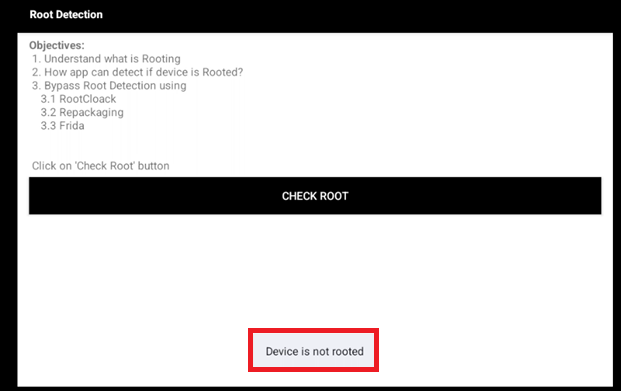
Root Detection
Here I demonstrate root is indeed accessible on device. Utilizing Frida and objection, I can disable root detection, and trick the device to think it is not rooting, therefore bypassing certain detection methods.


Emulator Detection
Utilizing Frida and objection, I can disable emulator detection, and trick the device to think it is not running as an emulator, therefore bypassing certain detection methods.
Whew! We did it! This concludes my Android testing set up with Raspberry Pi for now! From here, I’ll spend some time learning more on the Runtime Mobile Security tool and it’s perks, along with seeing what other cools stuff can be done with Frida / Objection.
I look forward to continuing to improve the pi setup, little by little, and including them in many more blogs in the future. Thanks for hanging out, until next time!